Well the past few days at work have been pretty incredible. I STILL don't have computer access (tell me this isn't a government operation) so I have been totally immersed in OOM (On Orbit Maintenance) Lessons. These are the astronaut lessons I mentioned earlier. My very first class was on the Common Attach System (CAS). Basically, the CAS is a big mechanical claw that grabs incoming external payload that will reside on the truss of the space station. These payloads can be simply storage, or experiments that require exposure to the vacuum of space. The CAS also has a powered "plug" that supplies thermal control, electrical power, and data transfer ability.
My next course was about the Common Berthing Mechanism (CBM). Every time they send up a new module to the space station, they use the CBM to automatically attach the new "room." This way, the astronauts don't have to do a space walk and attach the node by hand. Basically it is 16 powered bolt assemblies (big bolts that automatically screw themselves in), 8 alignment pins (4 coarse and 4 fine), 4 capture latches (powered latches that reach out, grab the incoming module, retract, and lock), and finally 4 controller panel assemblies (they power and drive the powered bolts and latches). We also went into the sequencing, nominal operations, and redundancies of the system, but I'll spare you those tedious details. Here's a photo of the CBM.
After a successful mating of the two nodes, the astronauts pressurize the new module, remove the CBM hardware, and enjoy the new room on the space station.
These first two classes were mainly mechanisms and maintenance, not really any hands on work. My next two classes, however, were very hands on.
I stayed late an hour and a half this past Thursday to take the Leak Repair Skills course. This class is pretty much exactly like it sounds. If a pressure seal of any kind wears out, or worst case scenario, there is a micro meteorite strike and the pressure within the space station begins to leak out into the vacuum of space, you are going to want to have taken this course. There are three procedures the astronauts have to repair the leaks. The first way to repair leaks are basically fancy suction cups. There are different shapes and sizes of cups on board the station that are to be placed over the leak and secured. Pretty simple, right? Well, you're right. The next method is a non-toxic epoxy specially made for use in space. It doesn't give off any fumes and is non-flammable. Finally, there is a putty substance that can be molded into a leak by hand.
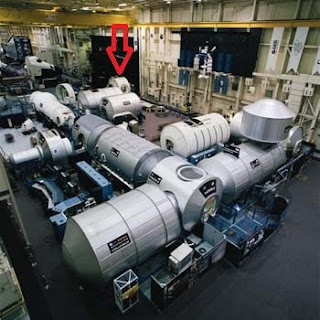
This is the vestibule operations trainer (VOT). This is the mock up in building 9 where we practiced our leak repair skills. In the following picture, you can see where it is in relation to the other mock ups.
The next photo is a high fidelity replica of a space station window. This was also used in the leak repair class.
My most recent class was today and it was all about the Maintenance Work Area (MWA). The MWA is basically a work bench for the space station that mounts right to the wall. It also comes with a containment system to catch particles or fumes from soldering, drilling, filing, etc. Basically anything they don't want the astronauts to inhale. In the class today, we were taught how to install, uninstall, and store the MWA. We also learned about all the components and hardware that comes with it. We each had to successfully unpack, install to the wall, or rack, attach the mounting components, then remove and re-pack the entire mechanism.
Here is the "space bag" that all the mounting and grounding hardware is stored in.
Here is the MWA work surface all installed and deployed, however, none of the mounting or containment hardware on it yet.
This is what the MWA work surface looks like when it is uninstalled and folded up for storage when not in use. It reminds me of R2-D2.
Here is the work surface with all the bells and whistles. This picture shows all the mounting hardware and containment system.
Here is a view of the Payload Development Lab 2. This is the mock up where the class took place. Note the life size model of the Robo-naut at the back of the lab.
This view is from the back of the lab (standing by the Robo-naut) looking towards the hatch.
Well that's 4 classes down, only about 20 to go! I'll leave you with a close up of the Robo-naut model flashing his gang hand-sign.


No comments:
Post a Comment